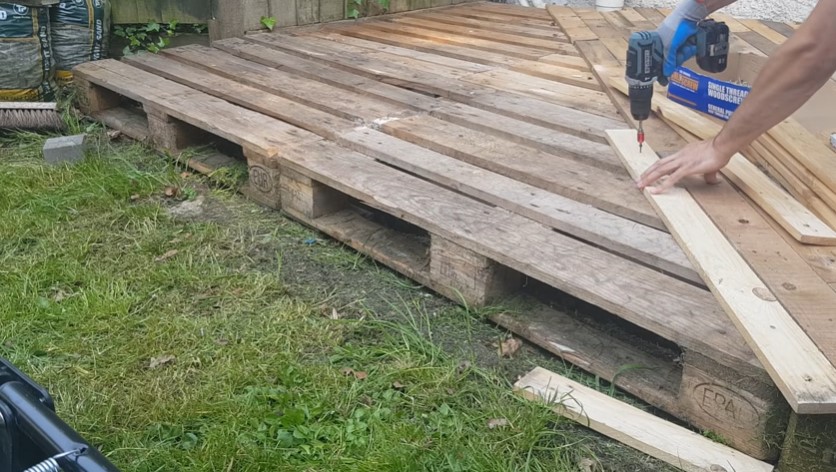
Using pallets to create a neat-looking floor for your bedroom, bathroom, or living room is a popular trend that can make for a functional and charming touch. You don’t have to spend or do much by using pallets to provide that rustic decor you’ve wished for. This is why today we’ll be telling you all about pallet floor ideas.
Furniture made using pallets is a thing, and more people join the trend. If you are looking for a low-cost floor option, pallets are a fantastic solution. These aren’t only functional but can add a rustic touch to your home decor. A pallet floor will look just great in your room, living room, or bathroom, and your family and friends will love it.
Contrary to what you may think, using pallets for your floors is not that complicated; however, you can always use the help of an expert. Pallets are an underrated source of decoration; it is no secret that heaps of pallets often end up being dumped by stores that receive lots of deliveries. However, these can be turned into functional items you can use at home. Keep reading and learn more about pallet floor ideas.
Pallet Floor Ideas FAQs
Can you use pallets for flooring?
Reusing or repurposing otherwise discarded materials is appealing for many, and the salvaged wood from pallets can be used for many projects. One such job is a rustic wood floor. Pallet boards are coarse, knotty, and unrefined but still usable. You can install the floor over wood and even vinyl.
What is pallet flooring?
Pallet flooring is exactly what you imagine, flooring that is made from deconstructed, wooden shipping pallets. The fact that hundreds of tons of old pallets land up on American landfills each year is an absolute waste of perfectly good building material.
Can you install pallet floors on concrete?
Yes, you can install pallet floors on concrete. Ensure that the concrete is sealed with a moisture barrier and use a strong flooring adhesive. This will prevent moisture from disrupting the adhesive, thus making your pallet flooring last a lot longer.
Why pallet floors?
- Low-cost. You can buy them new for approximately $20 or less, though you may have to purchase them in quantities of 10 or more. You can also purchase re-claimed pallet wood if you’d like to make things even easier.
- You might find them for free. Just inquire with local retailers or warehouses. You may also find them in or around dumpsters; just be sure to stay on the right side of the law and clean them well before transforming them.
- They’re versatile. You can easily disassemble pallets, and some plans don’t even require you to do that; you can leave them as they are. The hey can offer durable and truly unique-looking wood flooring.
- They’re light. Well, kinda it depends on the wood and size of the pallet.
- Naturally stylish. Some pallet wood looks pretty good as-is but is also the perfect base for an excellent wood stain or a dog-safe paint.
- Eco–friendly. Reusing materials that would have otherwise ended up in landfills is a good deed for our planet, and reusing pallets to build your own bed will likely be cheaper than any eco-friendly dog bed out there.
How to safely pick your pallets for your floors?
- Try to pick the newest, best-looking pallets you can find if you’re not buying new ones. Pallet wood can splinter, and new pallets will typically produce fewer wood slivers than older ones, which have been beaten up during use.
- Avoid pallets that have been contaminated with dangerous chemicals. It is often impossible to figure out what a pallet has been used for, but the location will provide helpful clues.
- When disassembling a pallet, always double and triple-check for loose nails, staples, or screws. These types of fasteners may injure your dog, so you’ll want to remove them all.
- Avoid super-old pallets, which may be made of wood that’s rotting or infested with termites or other insects. Similarly, avoid any pallets that are covered in mold, fungi, or different types of science-project slime.
Where can you find free pallets for your DIY floor projects?
A pallet sitting behind a grocery store dumpster was probably used for shipping produce, boxed food, or general household products. Conversely, one you find behind an industrial solvent manufacturer may have been contaminated with various dangerous chemicals.
Which are safe pallets for DIY pallet flooring?
Pallets may have an “IPPC” stamp. “IPPC” stands for International Plant Protection Convention. These pallets are treated with safe methods and are designed to kill plant disease or invasive insects. Pallets that are treated with these methods will have a stamp on them. An “HT” stamp indicates that the pallet has been heat-treated. A “KD” stamp on the wood pallet indicates that the pallet has been kiln-dried. A “DB” stamp means debarked.
Which are unsafe pallets for pallet floors?
Some pallets may be stamped with “MB” which means it has been treated with Methyl-bromide. It is best to avoid these pallets and pallets with a “CT” stamp which means the pallet has been chemically treated. Avoid chemically treated pallets when searching for pallets for pallet flooring as these chemicals can be dangerous to your health. Be safe by following the advice mentioned above, and if you are unsure, it is best to leave it and move on.
Pallet Floor Ideas
Tools
- Safety goggles
- Work gloves
- Dust mask
- Claw hammer, crowbar, or Pallet breaker
- Circular saw, or hand saw
- Orbital sander or belt sander
- Dish soap and water
- Bleach
- A spray bottle
- Floor adhesive
- Roller, paintbrush, or notched trowel
Installation
Disassembly
- Be sure to don a pair of work gloves and some safety goggles. Use a claw hammer to gently but firmly pry the planks from the pallet, trying not to damage the plank. A crowbar or pry bar might give you some added leverage, but the best tool for the job is a pallet breaker.
Preparation
- Depending on how many planks survived the disassembly, one disassembled pallet could leave you with enough planks to cover 2 square yards; Once you are certain that you have enough planks, you will need to remove all the nails from the wood.
- If any planks have damaged ends, use a circular saw to cut them off. If you want to achieve a smooth floor, running all the planks through an electrical planer might be an idea.
- Wash your planks with dish soap, water, and a scrubbing brush to remove any grease or grime that may still be on the surface of the wood.
- In a spray bottle, mix up and solution of one part beech to three parts water and spray the surface of the planks. Allow the planks to dry in an area out of the weather.
Laying Down Pallet Floors
- First, remove the old flooring as well as any skirting. Clean the area thoroughly by removing any leftover adhesive or dirt. You may want to apply a moisture sealant to the concrete floor.
- To test if this is necessary, you can tape down a piece of transparent polyurethane sheet to the floor. After 24 hours, you may notice that water droplets form on the plastic. This is a sign that you need to apply a coat of concrete moisture sealer.
- Have a look at the different floor patterns available. Choose which one works for you. Bear in mind that you will be dealing with planks of wood of different shades, so spread them around out, so you do not have too many of the same shade in one area.
- Use a suitable quality floor adhesive to stick down the planks. You may want to lay down a subfloor as this can give your floor added strength, but it is not entirely necessary. Work from one end of the room to the other, sticking down the planks while allowing 10 millimeters of space between the wall and the planks.
- Allow at least 24 hours for the adhesive to cure before resuming normal use of the floor. At this point, you may want to stain the wood or apply a high gloss finish.
Pallet Floor Ideas Online Options
Bare Decor EZ-Floor Interlocking Flooring Tiles
The EZ-Floor interlocking flooring tiles come in an oiled finish in solid teak wood. No glue or tools are required – just snap the interlocking tiles together.
It can be used for indoor or outdoor settings. Perfect for an entryway, mudroom, deck, terrace, showers, bathrooms, pools, or anywhere in between. Solid hardwood – scratches can be sanded out.
Tiles can be removed and relocated if needed. Each tile is nine solid pieces of solid teak wood on a plastic base.
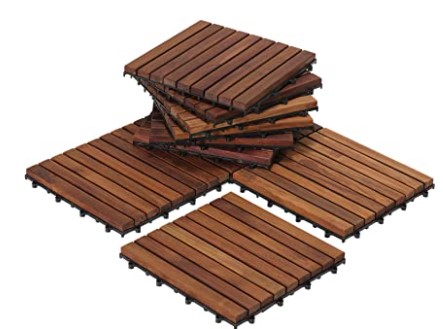
Features:
- Brown
- Solid
- Easy DIY Installation
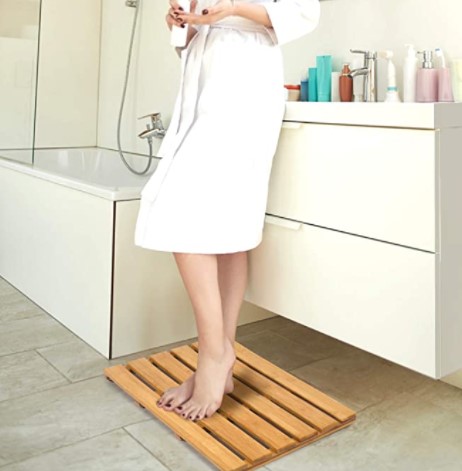
Bamboo Waterproof Floor
With three coats of spar varnish on every slat, smooth and comfortable for touch. Slatted design allows for a shorter drying time.No assembly required.
You can tip the bat mats up after daily use wipe them with a damp cloth when needed. Free your worries of cleaning problems.
This shower floor mat can hold up to 225lb, is well constructed, and quite sturdy. An admirable gift to your loved one or a housewarming gift. Both thoughtful and practical.
Features:
- Non-Slip
- Indoor/Outdoor
- Natural Bamboo
Pallet Floor Ideas Additional Tips
- When sticking pallet floors onto the concrete, use strong tape to prevent the planks from shifting before the adhesive dries. Peel away the tape once the adhesive has cured completely.
- Some pallet wood tends to be quite splintery. Be sure to wear a pair of tough work gloves to protect your hands when handling pallets, especially when it comes to disassembly and machining.
- Skip the sanding process and apply a clear polyurethane coat to the sealing floor if you are looking for a rustic-looking floor.
- If you want a more professional finish, consider renting a drum sander to achieve an ultra-smooth professional-looking pallet floor.
- As always, measure twice; cut once. You don’t want to run out of material and have to go scavenging for more pallets mid-project.
- Before letting your doggo sleep on the bed, be sure to check for any leftover fastenings, such as nails, staples, or screws.
- Avoid pallets that may have been contaminated with harmful chemicals.
- Watch for splinters. No one appreciates splinters, so you may find it necessary to sand or finish the whole thing.
- Use wooden pallets with caution. If you have animals or small children, they may tend to chew up stuff.

